

Basketball is a game that may be played just about anywhere; provided that the right environment is provided. One of these places is atop the water bodies. These are places that are right above the bodies of water. To be able to play the game in such places, you have to fix a special basketball.
Even though fixing the basketballs in such places demand lots of expertise, it need not necessarily to be that way. Indeed, it is possible for you to do that on your own without garnering too much expertise, to begin with. We are here to help you out in this how to DIY floating basketball hoop.
Read Also:
Top 9 Best Floating Basketball Hoop Reviews For Summer Cooling
How to Diy Floating Basketball Hoop?

Tools and Materials Required
You will need to acquire and accumulate the following tools and materials before you start out:
- 10 feet of ¾-inch PVC material
- 7 feet of ½-inch PVC material
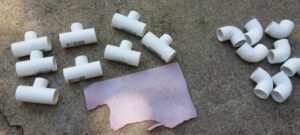
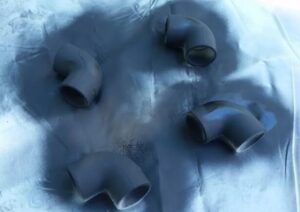
- (8x) ¾-inch 90° elbow
- (8x) ¾-inch x ¾-inch x ½-inch T-joint
- PVC cement
- Basketball net
- 1 or 2 pool noodles
- Zip ties
- Ball
- Box miter saw
- Tape measure
- Sharpie
- Water-resistant spray paint
- Sandpaper
- Hacksaw
Step-by-step Procedures
Now follow the procedures stipulated below on how to DIY floating basketball hoop:
Step I: Prep the working area
After gathering the necessary essentials, you now have to prep the work area. This simply means putting in place measures and strategies that are all aimed at facilitating the installation of the hoop altogether. Start out by cordoning the work area to keep at bay all trespassers who might also get injured.
Use the yellow ribbon to surround the area where you intend to operate in. Then, if possible, place signage that says, ‘Works In Progress or ‘Out of Bounds,’ or ‘Keep Off,’ among others. In case there is insufficient illumination in the area where you plan to work, be sure to furnish extra lighting.
The same goes for the level and degree of ventilation therein. You do not want to suffocate and predispose yourself to the risks that come along with poor ventilation, do you? Lastly, keep all the small children at bay as they are at the greatest risk of injuries and other issues.
Step II: Put on the necessary protective gears
Take a step now to protect yourself now. In the course of undertaking the installation exercises, you are bound to be subjected to some kinds of injuries. These include sharp prickles in your eyes and other sensitive areas of your body. To protect them, you have to put on quite a number of protective gear.
These include the goggles for the eyes, the helmets for the head, a pair of gloves for the hands, an apron or overall to shield your body and clothes from the direct line of contamination, and a pair of gumboots to protect your fragile feet from any dropping objects or other issues that may harm it.
Over and above all these, you also have to exercise some slowness and caution as you go about the task of installing the items in place. Remember, the faster and the more negligent you work, the more likely it is that you will pose some damages and injuries to your body.
Step III: Cut the PVC and the Noddle
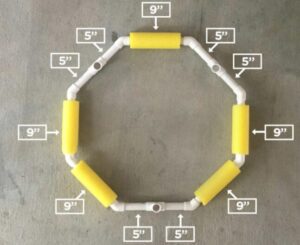
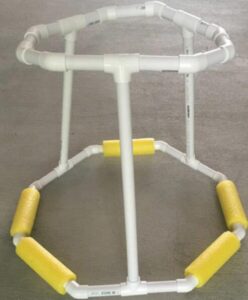
Get to the core of the business of installing this floating basketball hoop now. Start it out by cutting the PVC and the noodle. The precise dimensions of the cut depend largely on the exact size of the hoop that you are angling at. In the absence of preference, we urge you to settle for the standard measurements.

These include the 8 sections of the PVC pipes that measure ¾ inches in diameter. Cut out these pipes up to lengths that get to 6 inches for the top and a further 8 inches for the bottom. It is important that you vary these measurements as nearly as can be to the precise dimensions of the basketball you target.
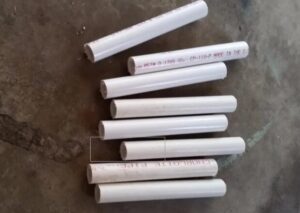
At all times, use the box miter saw to do the cutting. Then, sand the burrs that exist at the ends of the pipes for the sake of coming up with a smoother and safer end result. Finish off this business of cutting the pipes by slicing one whose diameter is ½ inches into four sections that are each 20 inches long.
You will use these to prop the basketball up. Yet again, remember that you can vary and adjust these measurements as per the unique specifications and preferences you are looking at. Thus, just use the dimensions we have given forth as inspiration not mandatorily.
Step IV: Spray paint the pipes
Though optional, you are highly advised to spray paint the pipes to add some touch and feel of aesthetics to the pipes. Kindly note that paints do not really stick to the surfaces of the pipes properly as the surfaces of the PVC materials are smoother while paint requires some roughness to stick.
For the best results, you are advised to apply multiple coats of the same paints. Also, pay special attention to the precise kind of paint you employ. Not any you pick at random may yield the outcomes you badly want. The one you eventually set your hands on has to be really sticky and long-lasting.
Step V: Kick start the assembly process
The time has now come for you to kick start the assembly process. This simply means you attaching the various parts and components to each other to be able to accrue one monolithic structure. Slide the constituent pieces of the noodles over the ¾-inch pipe after which you should put them on the 8-inch long sections.
In case they do not fit as smoothly as can be, you have to wait until the next step to attempt the entire exercise yet again. Test the system at each stage to see to it that it is truly firm and full of integrity before you proceed to the next step. You might have to redo the entire exercise just to get things right.
Step VI: Fine-tune the assembly process
We indicated earlier that the parts and components may not really fit smoothly in the previous stage. If that is the case, you now have to fine-tune the installation exercise at this stage. To do this, you have to widen the openings typically by using a spade and a drill bit.
As you do this, be sure also to panel beat or cut the pipes into the desired lengths. After doing that, slip them in yet again and observe how they fair on. Make further adjustments until such a time that you now have the precise dimensions and degree of fit that is desirable for you.
Step VII: Cement the PVC materials together
Upon fitting all the parts and joints together, you now have to cement them firmly. Cement the base and indeed all the joints using putty or other adhesives. Shake the outcomes somehow to be able to find out whether the joints are indeed firm and stable or not.
Do not cement the pipes that are not turned or twisted otherwise the structures shall come out warped and largely out of shape. Leave the structures unattended to for some time after cementing the same. The purpose of this stage is so that the cement may dry and harden. Round up this exercise by placing the item in the water. Adjust as need be for firmness, strength, and vitality.
Step VIII: Put on the Net and Noodles
Conclude the installation exercise by putting on the net and the noodles. Match the loops with the corners for the sake of smoother end results. For instance, if you are using a net that has 12 loops and four goals, be sure to fix one loop on each corner.
Then, go ahead now to merge the two jointly in a middle T-joint. The end result has to be firm and natural. Ziptie the merger to the rest of the net to allow for firmer joints and overall outcomes. You should do so in such a way as to conceal the zipties at the conclusion of the exercise.
NB: Slide the noodles over the pipes and then deploy the zipties in case you do not want them to fall off from time to time.
Step VIII: Test the System and Have Fun!
You are almost good to go now. But before you go, you have to test the system. Shake it slightly and take the time to observe how it performs or behaves. Make any further adjustments at this stage and only call it a day after you are really sure that the system is spik-and-spun. You may now have some fun!
Conclusion
From the explanations we have provided for above, one thing stands out. That the entire exercise is detailed and hence demands too much attention from you. This being the case, you can never tackle how to DIY floating basketball hoop above speedily or carelessly. Instead, you want to really ready the fine print and practice first before embarking on the installation exercise.